
 |
| Stars and Stripes repeat flag bunting as a cockade |
Bunting! Flags! Banners! It's hard not to get excited when decorating for July 4. Here are some ideas that all come from our repeat flag pattern bunting or ribbon. It comes in different widths (4"x6" and 12" x 18").
Stars and Stripe cockades – what a Revolutionary idea!
And they are. Cockades were popular 18th century and 19th century decorations on hats, jackets, cushions – you name it. It was and is an easy, inexpensive and a highly decorative way to take ribbon and make something that grabs the eye.
A decorative, half cockade...
The half-cockade fan decoration starts with a length of flag bunting (4 flags long) from the flag pattern ribbon bunting. Start by folding the first flag so that half the stars are folded underneath for a clean edge.
Holding the material at the bottom edge in your left hand, simply start folding the ribbon bunting like a fan: Hold the fabric at the bottom so that the top fans out and the bottom stays tight.
We made two folds on each little flag pattern: one fold was at the edge of each star field and the other was about mid-way through the stripes. At this point, just work it with your hands. It is flexible (it's cotton) and easy to manipulate.
When you have your folds where you want them, crease them with your hands or iron them down. Then, either make a stitch or add a drop of hot glue inside each fold at the bottom, so that it all stays together. You do not need to glue down or stitch this together anywhere else. Also make sure you fold the last flag edge under, like you did with the first flag.
Hot glue your button over the bottom part of the fan. If you want to make it into a pin, just glue gun on a pin backing. They're easy to find at any craft store. You're done!
Materials:
1 roll flag pattern ribbon bunting
glue gun (or needle and thread)
stick pins
optional pin backing (available at any craft store)
optional pin backing (available at any craft store)
See it with pictures:
This ribbon cockade is very effective and not too difficult if you are handy with a needle – as in knowing how to thread one.
These instructions come from the blog, Instructables: Make a Ribbon Cockade.
Flag Swag 1
Attach the flag bunting to the rail, evenly spaced and tied each tied down with string. Make sure the "hang" of the swag also is even.
 |
| Starting to fold. Left edge already tucked under. |
 |
| Figuring out the next fold. This determines the others. |
 |
| Nearly done and not yet glued so nothing is written in stone. |
 |
| Gluing everything else, then sorting out that last fold over. |
 |
| Done! All glued and ready to use as decoration or wear. |
A full ribbon cockade ...
 |
| Ribbon cockade by Idle Hands |
These instructions come from the blog, Instructables: Make a Ribbon Cockade.
You
will need 4' (or more) of 1" grosgrain ribbon to duplicate this cockade
or similar. The longer the ribbon, the more points or folds you can
have in your cockade.
Materials:
4' or more of 1" ribbon
needle and thread
stick pins
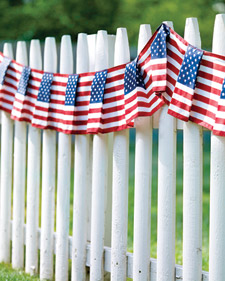
Flags with swag!
You can use our flag pattern ribbon bunting as a fence swag in several ways.Two versions are below. Flag Swag 1
Attach the flag bunting to the rail, evenly spaced and tied each tied down with string. Make sure the "hang" of the swag also is even.
Pre-measure all the ribbon lengths before cutting so that they, too, will be even in size. You can tie a bow at each swag without any tails hanging, or you can tie a bow with an extra long and decorative tail. Third version: No bow! Just make a neat circle around each swag with the knot tied on the bottom and the ends tucked inside.
Bow tying tip:
Before you cut anything, play with the ribbon. Tie it different ways. Use the flag pattern to help you determine the size and effect you want. We based our ribbon on a simple bow with each half being the size of one flag.
 |
| Flag Swag 1 (via usflagstore.com) |
Flag Swag 2
If you sew the bunting before you attach it to the railing, the folds can wave in the breeze. It takes a bit more time and about double the bunting but it's a clean and effective look.
Instructions come from MarthaStewart.com.
 |
| Flag swag 2 (via MarthaStewart.com) |
If you have any bunting ideas, please email us (lpb.usflagstore@gmail.com) with pictures so we can share them on Facebook.
No comments:
Post a Comment